Entity Type Management
This document describes how to customize entity types to extend the asset management capabilities of the Unified Catalog.
Navigate to Unified Catalog > Entity List, click the "Settings" icon in the left sidebar, and select "Manage Entity Types" to access the Entity Type Management page.
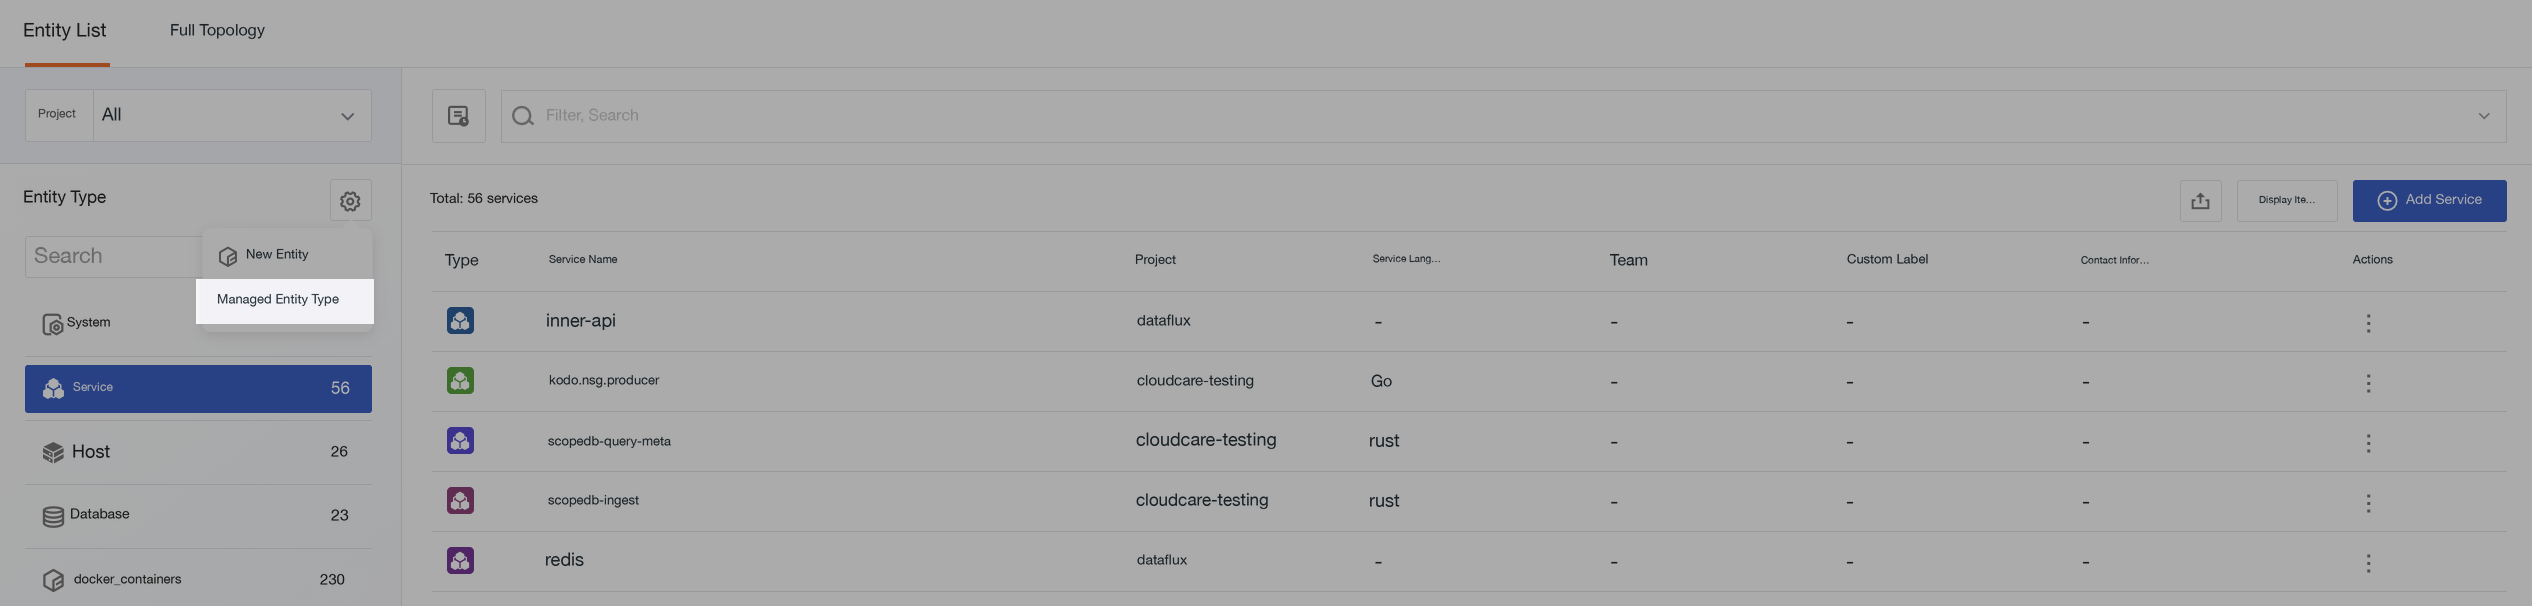
Create an Entity Type
- Click "Create Entity Type" in the upper right corner of the Entity Type Management page.
-
Fill in the basic information:
- Entity Type: Globally unique identifier, e.g.,
kubernetes_deployment. - Display Name: Enter the display name for the entity type.
- Description: Optionally provide a description of the type's purpose.
- Entity Type: Globally unique identifier, e.g.,
-
Expand the "Advanced Configuration (Optional)" section to customize the Data Schema, display columns, and related views via YAML.
- Click "Save" to complete the creation.
Note
- Entity type identifiers must be unique. The system will display an error if a duplicate identifier exists.
- Before deleting a type, ensure no entities are associated with it; otherwise, deletion is not possible.
Advanced Configuration (Optional)
When creating or editing an entity type, the "Advanced Configuration (Optional)" section is displayed below the basic information. The system generates a configuration based on a default template. You can use the default configuration as-is or edit the YAML as needed.
Data Schema Configuration
Defines the fields, sources, required attributes, and validation rules for the entity type. A YAML preview is generated by default based on the system's default DataSchema template.
- Official Entity Types: Based on
dataschema.yaml, supports appendingcustom_properties. - Custom Entity Types: Based on the Unified Catalog's default template, supports custom fields, sources, required attributes, enums, default values, and validation rules.
Click to view the Data Schema Configuration Guide.
Default Display Column Configuration
Used to configure fixed columns, default columns, and optional columns in the entity list.
Configuration rules:
field: The field name.fixed: Whether the column is a fixed display column. Default isfalse. Fixed columns are always displayed and do not appear in the enable/disable column list.hidden: Whether the column is hidden by default. Default isfalse.falsemeans it is displayed by default;truemeans it is not displayed by default but can be enabled in the column configuration.- Shorthand notation like
name,entity_typeis equivalent tofield: name,field: entity_type, and is displayed by default. - User personal column preferences take precedence over the type's default configuration.
Click to view the Default Display Column Configuration Guide.
Related View Configuration
Configures the related views on the entity details page.
- For official configurations, supports enabling or disabling built-in related views via YAML.
- Supports adding custom related views via YAML.
- To configure a default index for log-related views, use the
indexfield in YAML, specifying multiple indices as an array.
Configuration example:
telemetry:
  - name: { zh-CN: "错误日志", en-US: "Error Logs" }
    type: explorer
    viewName: logs
    index: ["app-prod", "gateway-prod"]
    query: "service='{{metadata.service}}' AND df_status NOT IN ['ok','info']"
Click to view the Related View Configuration Guide.
Entity Type List
The Entity Type List page displays all entity types in the current workspace, including system-preset, officially built-in, and custom types. The list shows the display name, entity type identifier, description, entity count, and classification tags for each type.
Type Categories
| Category | Included Types |
|---|---|
| System-preset | system |
| Officially built-in | Service, Host, Database, Queue, K8s Service, Deployment, etc. |
| Custom | User-created types (e.g., K8s resources, business domains, etc.) |
Permission Restrictions
- The
systemtype supports editing and health configuration, with a default algorithm provided. - Other officially built-in types support editing and health configuration, but no default algorithm is provided. Only "Custom Function" or "No Configuration" is supported.
- Custom types support editing, deletion, and health configuration, but no default algorithm is provided. Only "Custom Function" or "No Configuration" is supported.
Health Configuration
All entity types (built-in and custom) support health configuration, allowing you to set a default health calculation method for all entities under that type.
Click "Health Configuration" in the action menu for a specific entity type row. The available options vary by type:
The system type supports the following three methods:
| Method | Description |
|---|---|
| Enable Health Calculation | A toggle to enable or disable health calculation. When disabled, no health status is calculated for entities of this type, the health status is not displayed in the directory list, and filtering by health is not supported. |
| Default Algorithm | Uses the platform's built-in aggregation algorithm to calculate health. |
| Custom Function | Calls a Func platform function to calculate health. After selection, you must specify the specific Func function. |
Non-system types support the following two methods:
| Method | Description |
|---|---|
| Enable Health Calculation | A toggle to enable or disable health calculation. When disabled, no health status is calculated for entities of this type, the health status is not displayed in the directory list, and filtering by health is not supported. |
| Custom Function | Calls a Func platform function to calculate health. After selection, you must specify the specific Func function. Non-system types do not provide a default algorithm. |
Application Rules
- The configuration here serves as the default rule for the entity type and applies to all entities under that type.
- When creating or editing an entity, you can choose to follow the type's default configuration or specify a custom function individually. Entities with individually specified functions are not affected by changes to this configuration.
- If the custom function configured here is deleted or unavailable, the health status of entities following the default configuration will display as "Unknown". Entities with individually specified functions are not affected.
What is Health?
Health reflects the overall operational status of an entity, divided into four states: Healthy, Warning, Critical, and Unknown.
For the system type, a system is a user-created business aggregation entity representing a business system or platform collection (e.g., "Payment System", "Order System"). Since alerts/events are typically associated with its underlying components like services, hosts, and databases, rather than the system itself, system health is calculated by aggregating the unrecovered alert status of its constituent entities.
Simply put: System health reflects how well the "various parts composing this system" are functioning overall.
For non-system types, health is calculated via a custom Func function. You can freely define the calculation logic in the function, such as comprehensive evaluation based on metric thresholds, log anomalies, trace error rates, etc.
Health Status Description
Health is divided into four states:
| Status | Score Range | Meaning | Common Scenarios |
|---|---|---|---|
| Healthy | 80–100 | The entity is functioning well overall, with no unrecovered alerts. | All constituent entities have no active alerts, or the custom function returns healthy. |
| Warning | 60–79 | The entity has anomalies that require attention. | Some constituent entities have warning or error level alerts, or the custom function returns warning. |
| Critical | 0–59 | The entity has serious anomalies, immediate action is recommended. | Core entities have fatal/critical alerts, or multiple entities are failing simultaneously, or the custom function returns critical. |
| Unknown | — | Health cannot be calculated temporarily. | The entity has no constituent entities yet, or the first calculation after creation is incomplete, or the custom function failed/returned unknown. |
Default Algorithm Explanation
The default algorithm is only supported for the system type, calculated via the following three-step aggregation:
1. Determine Constituent Entities and Their Importance
System health is calculated based on its constituent entities (e.g., services, hosts, databases). Different entities impact the system's health to varying degrees:
- Each entity has a base importance level. Higher-level entities have a greater impact on system health.
- You can also adjust the health influence weight for a specific constituent entity in the system, overriding the default level.
- If an entity is set to "Not Participate in Calculation", its alerts do not affect system health.
2. Evaluate the Alert Impact of Individual Entities
When a constituent entity has unrecovered alerts, the platform deducts points based on the alert severity:
| Alert Severity | Impact on Entity |
|---|---|
fatal / critical |
Severe point deduction |
error |
Moderate point deduction |
warning |
Minor point deduction |
info / Recovered |
No point deduction |
When a single entity has multiple active alerts simultaneously, the platform considers the top 3 most impactful active incidents, applying a decreasing coefficient for stacking (1st: full weight, 2nd: 50%, 3rd: 25%). This prevents score distortion from a large number of low-level alerts while not underestimating the risk of concurrent failures.
3. Calculate the Total System Score and Determine the Status
The system score is calculated using a weighted average:
- Multiply the alert point deduction for each constituent entity by its importance weight.
- Sum the weighted point deductions for all constituent entities, then divide by the total weight.
- Subtract the weighted average deduction from 100 to get the final system score.
Status Determination:
| Score Range | Status |
|---|---|
| 80–100 | Healthy |
| 60–79 | Warning |
| 0–59 | Critical |
Custom Function
All entity types support custom health calculation logic via Func. Non-system types must use a custom function to calculate health.
Entity Status Determination
Entity status reflects the reporting activity of the data source, automatically determined by the system based on the last reported time, requiring no manual maintenance. Currently supports Hosts (based on DataKit data reporting) and Services (based on APM Span data reporting).
Configure Determination Rules
Navigate to Unified Catalog > Manage Entity Types > Entity List, click the "Settings" icon in the left sidebar, and select "Manage Entity Types". In the entity type list, click "Set Determination Rules" at the end of the row for Host or Service types.

| Configuration Item | Description | Default Value | Configurable Range |
|---|---|---|---|
| Offline Threshold | If no data is reported within this duration, the entity is marked as offline. | 24 hours | 1 hour to 7 days |
| Offline Retention Period | If the entity remains offline beyond this duration, it is automatically removed from the directory. | 7 days | 1 day to 90 days |
Note
Permission Restrictions: Only workspace Owners, Administrators, or custom roles with the "Unified Catalog > Entity Classification Configuration" permission can edit these settings. Manually added entities are not subject to automatic determination and cleanup.
View Entity Status
1. Entity List
Filter by "Entity Status" column using All / Online / Offline options.
2. Entity Details Page
The status tag is displayed at the top. For offline entities, you can view the offline time, estimated removal time, and last reported time, and manually activate them.
3. Topology View
Supports a one-click option to display only online entities.
Manage Related Views
Click the icon on the right side of a single entity row to access the "Manage Related Views" page. The page is divided into Built-in Related Views and Custom Related Views sections.
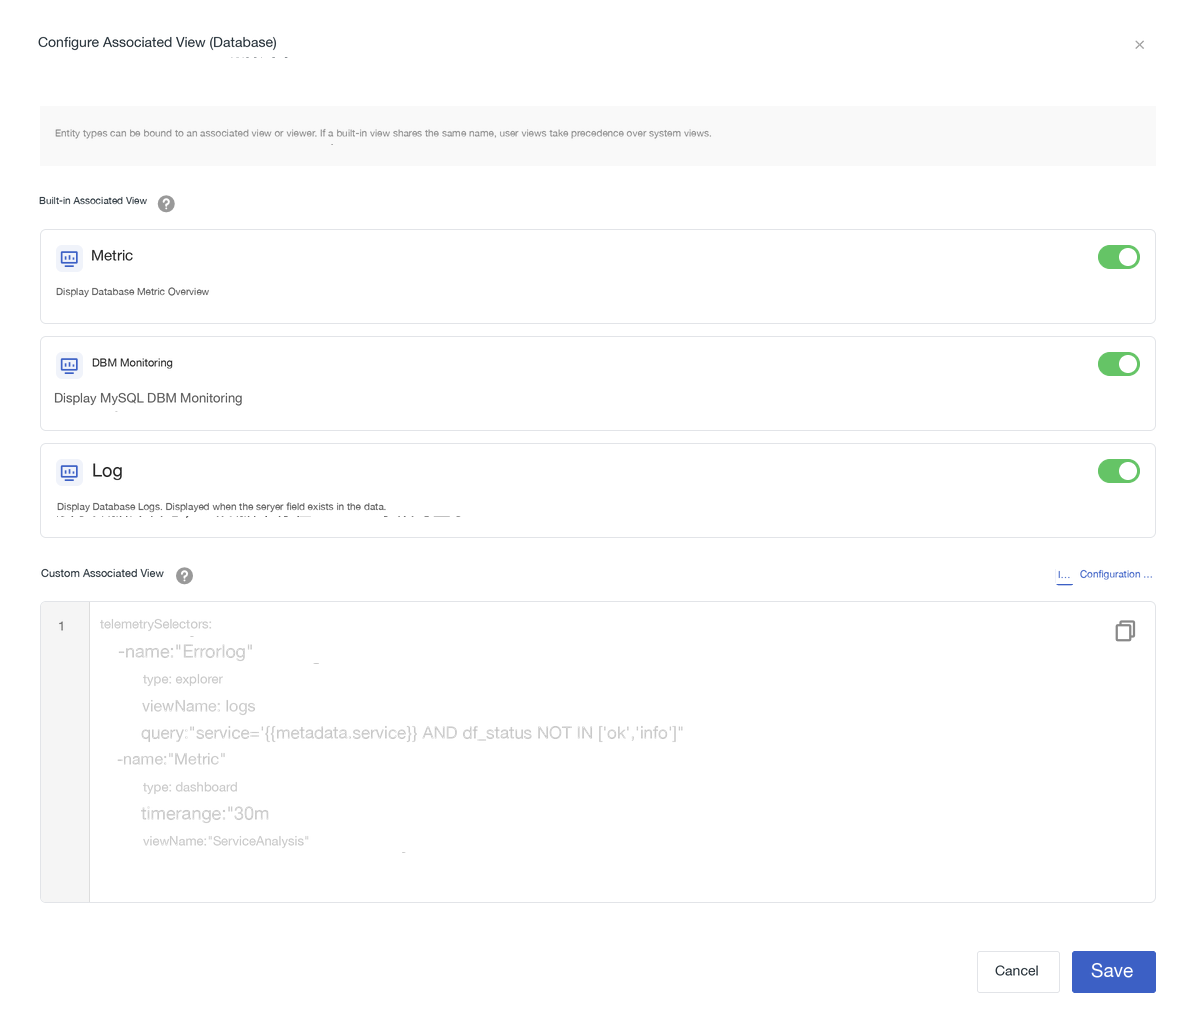
Built-in Related Views
These are related views provided by the system by default, which can be enabled or disabled as needed.
- If the current entity type has officially built-in views, the page will list them automatically, with the default status being Enabled.
- Enable/Disable: Supports customizing whether to display the current view.
When disabled, the view will no longer be displayed on the Entity Details Page.
Custom Related Views
Supports custom configuration of related views according to the specified format.
Once configured, all entities of this type will display the corresponding tabs on the details page, facilitating quick drill-down analysis.
Click to view the Configuration Details.